Ponds
Some might say, fibreglass and polyester resin (glass reinforced plastic = GRP) is as easy to apply as wall paper - with this step-by-step guide we hope to show you that with the right materials and application, that can be true! This guide will take you through all the things you need to consider when building a fibreglass pond.
Use the navigation below to find the section you need!
IMPORTANT: be aware of the toxic effects of solvents and chemicals on fish - for this reason the laminate and topcoat must be fully cured before filling your pond.
See the list below, or take out the guesswork and order one of our Pond Material Packs! And for tools - we have Tool Packs!
- Prymax GRP Primer
- General Purpose Polyester Resin
- Topcoat
- Catalyst (included with all purchases of resin/topcoat/gelcoat from CFS)
- Pigment (if not using pre-pigmented Topcoat)
- 450g Chopped Strand Mat
- Brushes
- Buckets
- Resin Rollers
- Consolidating Rollers
- Acetone
A step-by-step guide to fibreglassing a pond/pool
Here we have provided a simplified guide to the process of building a fibreglass (GRP) pond or pool. If you would like further information, please follow the links.
If you need to, you can laminate your pond in stages – just make sure that after each stage you leave it in the correct state for the next to be applied.
Before you start, ensure your pond structure can withstand the soil and water pressure. Usually, the pool is made from brick, lightweight block or concrete block. If using block, a cement render is required, and it must be fully dry before your Prymax GRP Primer coat is applied.
- Prepare all your materials and equipment prior to starting work. Cut and fray your CSM, get your buckets, brushes and rollers ready etc. See More Preparation Information
- Apply a coating of Prymax GRP Primer to the pond surface, following the instructions provided, and leave until the surface is ‘finger tacky’, like Sellotape (45-60 minutes, depending on humidity, but no longer than 4 hours). See More Prymax Information
- Starting with the walls of the pond, apply a coat of catalysed resin to the surface using a roller. Lay the prepared CSM onto the resin, and then roll another layer of resin over it to saturate, or ‘wet out’ the mat. Repeat with another layer of mat (cut to allow for overlap) and resin.
- Use a metal roller to ‘consolidate’ the two layers of saturated mat, fusing them together and expelling any trapped air to avoid white blisters on the surface of the laminate. See More Laminating Information
- Move on to the next ‘wall’ section in the same way, overlapping the mat with the previous section to ensure a smooth finish with no visible joints. Pipework and Fittings information
- Lastly, repeat the process on the base of the pond.
- As soon as the laminate is hard or can be walked upon, apply your catalysed Topcoat using a roller, at the correct rate of coverage. (Pot life of Topcoat is around 20 minutes, so it’s advisable to mix up smaller batches as you go along)
- Allow to fully cure, then flush with hot water, drain, fill, leave for several days, then finally drain again before filling for use. *This final step is important, to ensure all solvent and chemical residue is removed before exposure to marine life.*
Preparing materials for fibreglassing a pond
It’s important to have all your materials and equipment prepared and ready before you begin the process of lamination.
Fibreglass mat - before you begin, cut your CSM to the required lengths, allowing for a 15-20cm overlap at the top and bottom of the wall. The first piece of mat can be left at the full width of the roll, but the second piece should be cut to approximately 15cm thinner to allow for an overlap when the next section is laid. For subsequent sections, the mat width doesn’t need to be adjusted as the pattern for overlapping is established in the first section. When cutting glassfibre for an overlapping joint, always make sure the edges are frayed, which will result in almost undetectable joints between sections.
Polyester resin and catalyst – make sure you have the working quantities for resin and catalyst measured out, and your mixing equipment to hand, so you are ready to mix as soon as you need to.
Tools – ensure you have enough buckets, brushes and rollers to complete the job, as well as the required Personal Protective equipment.
Why do I need to use Prymax GRP Primer?
Prymax GRP Primer
- seals cement render, preventing any residual moisture from reacting with the resin.
- provides a bonding primer for polyester resin, increasing adhesion due to its chemical similarity.
It is important to follow the application instructions, with the catalysed polyester resin being applied as soon as the GRP Primer is "finger tacky" like Sellotape. This should occur after 45 - 60 minutes (depending on humidity), but no longer than 4 hours should pass before polyester resin is applied. Therefore, it’s advised not to apply GRP Primer over a larger area than you are likely to laminate within a four hour period.
If this is not possible, simply apply a coat of catalysed polyester resin to the GRP Primer, and this will enable the laminate to be continued later.
If the GRP Primer has been left to harden, you must abrade the surface before laminating.
How to apply a GRP laminate to a pond
When the Prymax GRP Primer is finger tacky, mix your pre-measured resin with the catalyst, mixing it in thoroughly (see our guide to Mixing Catalyst). We suggest mixing up enough resin for between 1 and 1.5m2 of CSM at a time. For large, flat areas, it is quicker and easier to apply the resin using a medium pile roller.
- Roll on a coat of catalysed resin to the GRP Primer
- Lay on the first section of glass fibre
- Apply more resin to "wet out" (saturate) the glass fibre. As the binder holding the glass fibre dissolves, it will become translucent.
- Then apply the next layer (15cm narrower in this case) and again apply more resin.
- Once the glass fibre has been "wetted out", consolidate the two layers of glass fibre using a metal roller. The roller can either be a paddle roller or a metal washer roller, which, when used vigorously, not only forces the two layers of glass fibre together but it removes any trapped air. This appears in a laminate as a white blister, and care must be taken to ensure that all air is expelled.
- If a third layer is being applied the procedure is exactly the same, except the width of the glass fibre is another 15cm narrower, again to allow for an overlap.
- Once this section is complete, move on to the next. Because the overlap is now built in, full widths of CSM can be used.
- When the walls of the pond are complete, move on to the base.
- Then allow to fully cure before applying Topcoat
How do I fibreglass around corners?
Unless the corners are radiused (curved), do not attempt to take the glass around a corner. It’s difficult to "persuade" glass fibre to lie into right angled bends.
The best thing to do is to start again with a built-in overlap. Since there will be a butt joint at the corner, it is recommended that a strip of fibre glass, about 20cm wide, is cut with the edges frayed out and then applied as a tape would be into the corner.
Once this glass fibre has been wetted out, use a brush with a stippling action to work it into corners and around more complicated and compound shapes. If preferred, the fibreglass mat can be pre-wetted out on a flat board before being stippled into position.
Fibreglassing around pipes and fittings
It’s likely that you’ll have to fit your GRP laminate around various pipes and fittings.
These are usually in stainless steel, PVC or UPVC (unplasticized PVC).
Bonding of polyester resin with pipe material:
UPVC – reasonably strong adhesion without Prymax GRP Primer
Stainless Steel – apply Prymax GRP Primer
PVC – a specialist PVC Primer is recommended
Generally, when laminating into rebates such as drainage sumps, it’s best to take the glass fibre down into the rebate to stop water penetrating beneath the laminate. Fittings must be bedded down firmly and, if necessary, either sealed into position with a suitable mastic or bolted down.
With PVC pipework (if primer is not being used), first thoroughly key the surface, and secondly, allow a generous "collar" round the pipe where it emerges from the wall or bottom of the pond. Once cured, apply a mastic sealant to the joint between PVC and GRP to ensure a watertight seal.
What are the Benefits of GRP (Fibreglass) Ponds?
- Resistant to weathering and temperature variations
- Provides a water tight, smooth and easy to clean surface.
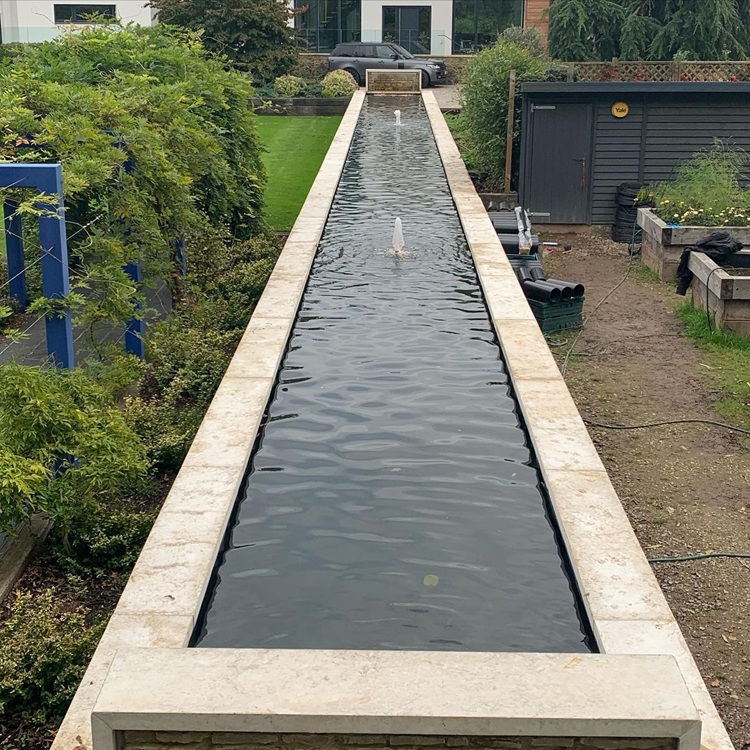
What colour should my pond be?
The usual colours for ponds, particularly Koi ponds, are either black or British Racing Green, because Koi show up particularly well against dark colours. But if you fancy something a bit different, we can mix your Topcoat to any colour you like!
How much resin, CSM and topcoat do I need for a fibreglass pond?
Firstly, you need to know the surface area of your pond. You will need a minimum of two layers of CSM – three is even better! This means you’re much less likely to have trouble with leaks once your pond is fully cured and filled.
The weight of Chopped Strand Mat (CSM) (usually 450g for ponds) is given per m2, and the resin usage will be 2.5x the weight of the CSM.
So:
For each 1m2 of 450g CSM, we will use approximately 1.13kg of polyester resin.
450g x 2.5 = 1125g = 1.125kg resin
NOTE: it’s advisable to round up rather than down, and you may want to add around 5% extra for wastage – our Pond Material Packs allow for wastage.
You will need 400g of Topcoat per m2.
So let’s say your pond is 15m2 and we’ll be using 2 layers of laminate – to find out the materials required (including wastage) we would do the following simple calculations:
450g x 15 = 6.75kg x 2 = 13.5kg x 1.05 = 14.2kg CSM
1.13kg x 15 = 16.95kg x 2 = 33.9kg x 1.05 = 35.6kg resin
400g x 15 = 2kg x 1.05 = 2.1kg topcoat
In addition to this, you will need catalyst (included), Prymax GRP Primer (coverage 6-10m2 /litre), tools and cleaning materials.
Working temperatures/ Curing times
Two things will affect the working/curing times of polyester resin:
- Amount of catalyst
- Ambient temperature/humidity
The more catalyst you add, the shorter the working time (also known as ‘pot life’) and the quicker the cure (we recommend no more than 3% addition by weight). It’s best to use a catalyst dispenser to measure the correct amount of catalyst - we’ve provided a table below, but see our Mixing Catalyst guide for more information.
Polyester resins will not cure properly at low temperatures (below 10°C), or with high humidity. If the temperature is too high (25°C +), your working time will be too short to get anything done! Ideally, the temperature should be around 18°C.
It’s also worth checking the weather forecast, as rain can ruin a laminate while it’s still wet. You can protect against damage by using a tarpaulin to cover the pond if rain is expected.
Catalyst Gel Time M.E.K.P.
| Temperature | 0.75% by weight | 1.00% by weight | 2% by weight |
| 20°C | 40 mins | 25 mins | 15 mins |
| 15°C | 60 mins | 40 mins | 30 mins |
How long does polyester resin take to fully cure?
Again, this is dependent on ambient temperature, which is obviously not going to be constant! But as a guide, we would expect:
Between 15°C - 18°C, cure time is around 3 weeks.
Between 18°C - 24°C, cure time is around 2 weeks.
NOTE: Once cured, the pond must be thoroughly flushed with hot water and then drained. The pond should then be filled, left for several days, and then drained again before being filled for use.
How do I clean resin off tools?
Tools will need to be kept workable between applications – while mixing up further batches of resin – to do this, immerse the tools in a cleaner such as acetone. At the end of the work, clean the tools in acetone again and then wash them out in strong detergent and hot water. Ensure they are completely dry before using them again.
We hope this guide has been useful. If you have further questions or need some help working out quantities, please call our office on 01209 821028 or email us and we’ll be happy to help!